Baby Sewing Makes Me Happy...
... Especially when other things make me blue, like POSSLQ being out of town for a week. But my mom scored some long sleeve side snap baby tee's (which are impossible to find, and only come in the smallest sizes), so I thought it was time to dress them up a bit!
Then I thought, what a great thing to do a tutorial on! So here it is, a little lesson on my method of applique. And pictures of my other appliques I finished.
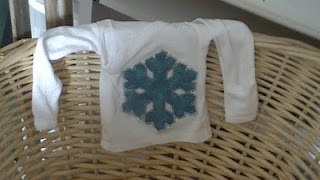


Step 1 - Gather your materials. Print your applique design. Remember, long, simple lines are better, but pretty much anything goes, if you have a good sewing machine and some patience. For example, the whale was easy. The snowflake was hard.
You'll need - your printed applique, some fusible interfacing, stitch witchery, your fabric of choice, and the material you are appliqueing on (t-shirt or other material). And, of course, your trusted sewing machine and a high quality iron. (I have feelings about irons, which is why I paid more for my iron than I pay to go to the dentist.)

Step 2 - Trace your pattern onto your fusible interfacing or fabric. In the case of my little elephant, his ear is a different color than the rest of his body, so I did the ear first on the interfacing since it's an easy design. After I traced, I fused the interfacing and cut the piece out.


Then, I traced the body straight onto the fabric after I fused the interfacing. In the picture below, I've fused, and am getting ready to trace.

Step 3 - Zigzag your edges. Don't cut your piece out yet! Go ahead and sew it. You'll find it much easier to do this way, and the interfacing makes the fabric SO much more stable! I highly recommend testing your stitch width and length on a scrap first, since this dense zigzag edging is a PITA to seam rip. I usually set my machine to a width of about 2.5-3, and my length to a hair above "0."

Step 4 - Cut out and fuse your applique to your base piece. Since I have a two layer applique, I had to fuse the ear to the body first, but the process is the same. First, cut your applique along the zigzag stitching, being careful not to cut too close, or you'll cut the stitches! I actually leave just a breath of raw fabric on the outer edge, because I'm going to sew over it again, and most of that will unravel and disappear in the wash. I lay my applique down face down, cut out stitch witchery to cover the whole back of the applique, lay my base piece (t-shirt or whatever) over it right side down, then carefully fuse the two together. I really like my critters to crawl along the lower edge of my baby shirts, but you can place your applique wherever you like!
Follow the directions that came with your stitch witchery. Mine likes me to cover the fabrics with a damp pressing cloth (AKA clean towel I spray with water) and press without moving the iron for 10 seconds. Then do the same thing on the opposite side.

Step 5 - Sew your applique to your base piece. Turn your stitch length up a little (you are just attaching, not going for that super close edging look here), and sew over the edges, attaching the applique to the base piece. If I'm sewing onto knits (t-shirts and such), I like to use a ball point/jersey needle on my sewing machine so I don't create runs beside my applique. Add some hand sewn embellishments (I've added a backstitched tail and a french knot for an eye), and Ta-Da! You're done!


My other recent baby-related project? Turning newborn sized onesies into t-shirts that a cloth-butt winter baby can wear. Super duper easy. Cut off onesie bottom as close to snaps as possible, zig zag the bottom edge, add long sleeves, and patiently wait for baby to arrive.


Comments
Post a Comment